I'm a mama of three doing what I love and fueled by Grace, Mercy, and a whole lot of coffee. I'm so glad you are here!
Hey, friend!
I'm Courtney.
mini brand
brand building
website design
template customization
tell me more
Browse by
category
Move to Manual: Understanding Focal Points
We are slowly winding down this series on understanding your camera a bit better and making that jump from Auto to Manual. I really appreciate all of the feedback that you guys have given and I hope that you are all enjoying this series as much as I’ve enjoyed putting it together. To view all of the posts in this series, be sure to check out the Move to Manual Button in the sidebar.
Over the last several weeks, I’ve received emails and comments from many of you who are loving the series but still feel like your photos aren’t quite where you want them to be. I’ve spent a while browsing through the Flickr Pool and visiting your blogs, and one thing that I noticed in several photos is that some of you are missing your Focal Points. The composition is good, the lighting is good, but the key areas of your image are slightly blurry. I know how frustrating this can be and it can ruin the look of an entire picture. So today, we’re going to learn to resolve that. The key to solving this issue lies with your Focal Points.
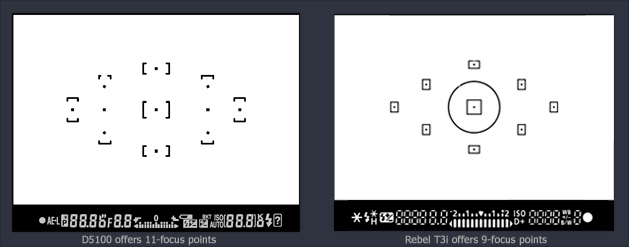
Pick up your camera and turn it on. Look through the eyepiece and set up like you are going to take a shot. Do you see those little dots within your viewfinder? Those are your Auto Focus Points.
Here’s an image of what they might look like depending on what type of camera you have. The one on the left is a Nikon, the one on the right is a Canon.
|| Source ||
I’ve already talked about using the rule of thirds and overcoming the desire to shoot with your subject in the center of the photograph all the time. But, being armed with that secret and tip for better composition won’t do you any good if your focal point is off. Most cameras are set to focus in the center by default. When you open your camera up for the first time, unless you change that setting, your camera is going to focus on the center point in your image. But there is a way that you can tell your camera where to focus.
On my Canon 7D (and I’m going to assume on all SLR cameras) if you shoot in Auto or Program mode, you have no control over where you camera focuses. Your camera is going to choose a focal point for you (which is all the more reason for you to leave Auto Mode behind!). Since you’re shooting in manual now (and I hope that most of you are!), it’s time for you to be the boss and tell your camera where it is that you want to focus your shot.
First things first, you’ll need to make sure that you camera is set to Auto Focus and not to Manual Focus. For information on how to do this (as well as how to change the settings that we will be discussing in this post) please refer to your Camera’s User Manual!
There are three different types of Auto Focus Modes: One Shot, Al Servo and Al Focus.
One Shot (Canon)/AF-S: Auto Focus-Single (Nikon)
One Shot Focus/AF-S is used for subjects that are being perfectly still and won’t be moving in any way. Buildings, plants, etc. Something that you know isn’t going to wiggle or even breath heavy while you are composing your shot and getting ready to snap your image.
Al Servo (Canon)/AF-C: Auto Focus-Continuous (Nikon)
This is typically what my camera stays on. Al Servo Focus/AF-C is for shooting an object that might move…like a wiggly and rambunctious three year old boy. I highly recommend that if you are going to be shooting children, babies, or even flowers that might blow in the breeze, that you consider setting your camera to Al Servo Mode. It offers a bit more security in making sure that your shot is in focus when your subject might move.
Al Focus (Canon)/AF-A: Auto Focus-Automatic(Nikon)
This is the in between auto focus mode. Al Focus/AF-A will automatically switch your camera from One Shot/AF-S (when you have a stationary subject) to Al Servo/AF-C (a moving subject) if the subject moves any. I’ve never used this mode because I primarily shoot people, but if you do a lot of landscape or architectural shooting, this might be something for you to check out if you want that option.
Now that you’ve changed up your camera settings and chosen the Auto Focus mode that suits you best, let’s talk about the actual selection of a Focal Point. Again, you’ll need to refer to your cameras manual for how to do this on your camera since each make and model is a bit different.
Choosing a Focal Point
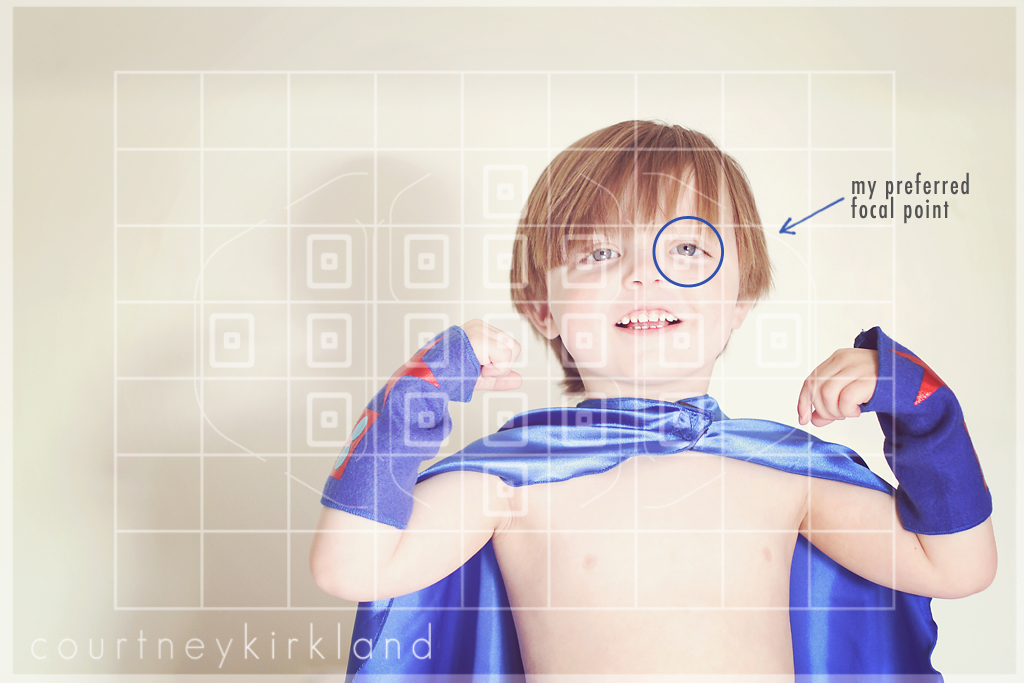
It’s a known rule that when you shooting images of people, you want the eyes to be the sharpest and clearest point in your image. That’s why you should always set your focal point on the eye of your subject. And I’m sure you’re now asking Which eye should I focus on? I have always heard (from other photographers and the various photography communities that I belong to) that you want to place your focal point on the eye that is closest to your lens. If your aperture is set properly, you should be able to focus on the eye closest to you and still get the other eye in focus as well.
As you can see in the image below, I chose Noah’s right eye as my focal point. Since I am right handed, I typically line my images up to the right (a habit I’m working on). That right corner tends to be my preferred focal point, depending on if I’m shooting horizontally or vertically.
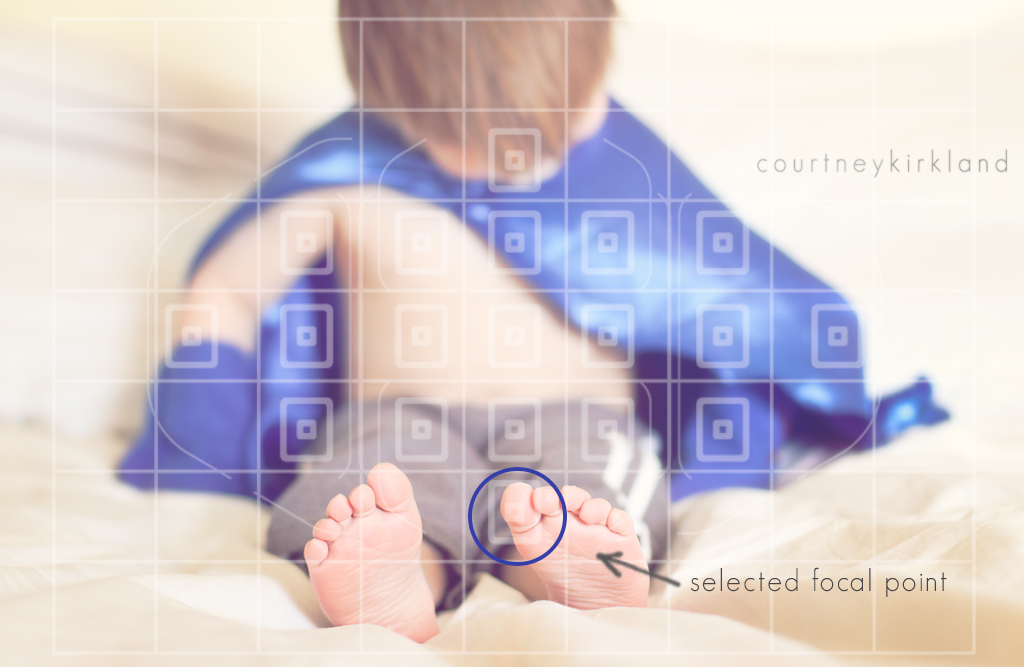
I don’t always focus on the eyes, though. Sometimes, when I’m going for more creative shots, I use different areas to focus on. For instance, in the photo below, I was going for a shot of just Little Man’s tiny feet. I set my focal point to his big toe and used a wider f/stop (a lower number) to active the bokeh in the background.
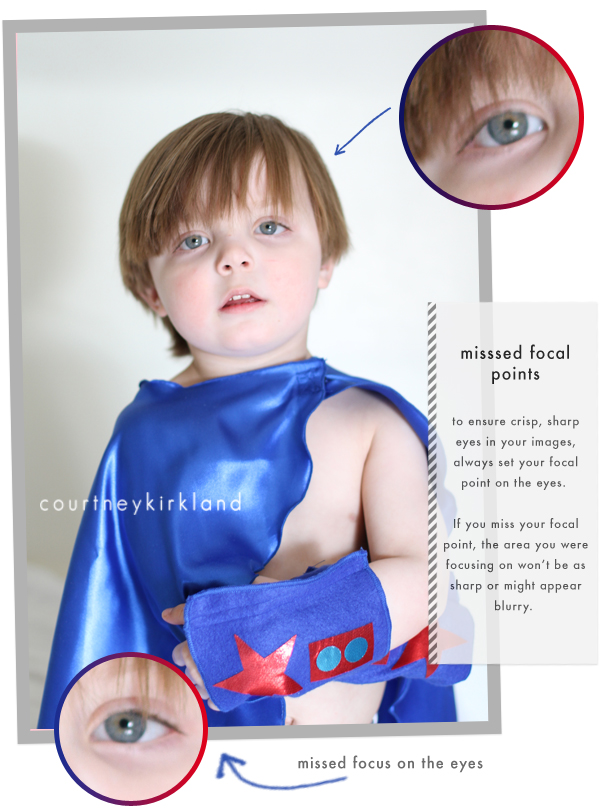
What happens if I miss my focal point?
Sometimes, especially when shooting children, you can miss your focal point. This happens to me sometimes, typically when I’m shooting with an aperture lower than 2.2 or so. When you use an aperture that wide, you have less of a focal plane and even the slightest movement can cause the image to blur. Take a look at the image below. At first glance, from farther away, it looks okay. But, if you zoom in on the eyes, you’ll see that I missed the focal point by just an inch or so. Instead of focusing on his eyes, I ended up focusing on his cheek. He probably wiggled or I moved when I clicked the image and it threw the whole thing off.
To Sum it Up…
Mastering focal points takes a LOT of practice. Especially if you are shooting babies, children or even antsy teenagers. It’s not something that I have mastered yet (nor do I think anyone ever gets it right in every single image). But, the key is to practice. Most cameras have a sweet spot when it comes to focusing. There are some areas that are sharper than others. Spend some time playing with the Auto Focus settings on your camera and see if you can find the spots that are sharpest for your particular camera. Remember, when shooting portraits focus on the eye that is closest to you. If you find that the other eye isn’t as sharp , try opening up your aperture a bit (a higher number) to get it in focus.
For this weeks Flickr Group Assignment, first I want you to find out how many Auto Focus Points your camera has. Then, find a few inanimate objects and try out your focal points. Put one object in the front and the other slightly behind it. Start with a wide aperture (a low number…maybe around 1.8 or 2.0 just to give you some great bokeh) and focus on the object in front. Then the object in back. Now move on your kids or another person (or pet) that moves. PRactice, practice, practice nailing that focal point! Upload your photos to the Group Pool or share them on your blog and come leave the link. I’d love to see how this changes your images!
Leave a Reply Cancel reply
Truly easy-to-customize websites for those who need a polished look with a quick turnaround.
Learn More ↦
Shop premade designs
Draw in potential customers with a seamless web experience and SEO optimized site pages.
Learn More ↦
website design
Discover your creative voice with a unique logo development & coordinating brand collateral.
Learn More ↦
brand building
A seamless single logo brand identity experience for those with a clear vision.
Learn More ↦


Live this series, thank you so much for sharing! 🙂 just a quick question, what are your thoughts on focus & recompose vs. toggling your focus points. Focusing is the thing I currently struggle with the most with (or the thing i am most focused on, ha!). thanks for this post!
You are certainly a multi-talented lady! I have dabbled with manual shooting for several years (I was on the yearbook staff 3 years in high school, two of which I was the editor, so I got to play with very expensive cameras), but I’ve always been kind of scared to dive in 100%. This post made me want to try it again. Noah is so adorable – I love seeing the pictures you take of him! 🙂
No worries Courtney thanks for the great advice .
I’ve been following along with your series (haven’t actually posted any photos) and was aware of the topics previously discussed. But this blog post has helped me tremendously. I just started shooting in manual just a few weeks ago, especially since I have a 50mm lens now. But it frustrated me when the camera focused on something else and left the rest blurry. I tried out some of your tips and finally got some shots I wanted. I’m still learning to master indoor shots (like at nighttime) but so far, I am LOVING my 50mm because I can finally have good indoor sports photos. 🙂 I’m looking forward to the metering topic since that is new to me as well. Thanks! 🙂
Another great post, thanks!
Still hoping you put a PDF out of all of these …. 🙂
This is a great idea. I always keep it single point, center weight and focus manually, press half way down to lock my focus and then reposition camera. Must try your idea, sometimes it could save time. But I think I have been doing it this way for so long it is second nature…
These series are really great Courtney. I say that every week, but I mean it!!!
Just a question on the focus … I’ve got a Nikon d5100 and the focus modes are af-a af-s af-c.
Just a bit confused as to which one I should use in manual ? The AF -area modes are single point dynamic and 3d . Which one would you suggest I use ?
AF-A (Autofocus Automatic) on the Nikon d5100 is the equivalent of the Al Focus on Canon. That will switch back and forth between the other two, depending on whether or not your subject moved. AF-S (Autofocus Single) is the One Shot Auto Focus that is for Still Subjects; and the AF-C (Autofocus Continuous) is the Al Servo for Nikon that you’ll need to use for moving subjects. Thanks for pointing out the difference in Canon and Nikon! I’m going to go edit this post to include this information.
YOU must have read my mind when you wrote this post!. Yesterday I took the girls to the park and was mucking around with my settings etc and came across that one shot, al servo stuff and had NO idea what it was!. I also JUST figured out my self-timer!. I am shotting in full manual now thanks to you and this series, and adjust my settings with the light meter usually. More so adjusting my shutter speed 🙂
I have totally enjoyed doing this and seeing everyon elses photo’s as well I try to look at everyone elses before I post mine that gives me ideas. Well I have blogged about the Focusing and here’s my link with my pictures that are already up in Flickr. http://www.haynesfamilyofthree.com/2012/03/focusing.html
First of all, great that you’re a Canon user. Got no problem with Nikon, I just can’t catch on with their terminology.
I’ve read lots of articles on those AF settings. I’m partial to One Shot, but I guess I can get away with it not being blurry if my shutter speed is fast enough. I will experiment with AI Servo.
You CAN compensate for a moving subject with your shutter speed. But remember that the higher your shutter speed, the less light you are letting in. So you’ll have to adjust some other settings (like ISO and Aperture). If you aren’t wanting to lose any of your depth of field and don’t want to risk extra, unneeded noise by upping your ISO, I would try Al Servo or Al Focus. 🙂