I'm a mama of three doing what I love and fueled by Grace, Mercy, and a whole lot of coffee. I'm so glad you are here!
Hey, friend!
I'm Courtney.
mini brand
brand building
website design
template customization
tell me more
Browse by
category
Understanding Aperture & Depth of Field
In case you missed the first two installments of the Move to Manual Series, so far we’ve talked about composition and perspective in your photographs and how to find great light. Make sure you check these two posts out!
My desire to learn photography and own an SLR camera came from the desire to achieve beautiful photos. Those crisp, sharp images where part of a photo was in focus and the rest was blurry? Those images mesmerized me. I spent hours scouring the internet looking for tutorials on how to achieve that effect. I kept getting words like aperture and depth-of-field but had virtually no idea what they meant or how I was supposed to apply them to my photography.
In my opinion, next to knowing where to find great light, aperture is the single most important aspect of achieving a great photo. The photos that you see where a small, minuscule amount of the image is in focus and everything else just sort of fads away? Those photos are created and controlled by your cameras aperture.
This is probably the most complicated and frustrating part of learning to work your camera, but once you grasp this and can understand the power that your aperture holds and how to utilize it, the rest is much easier to pick up and put into place.
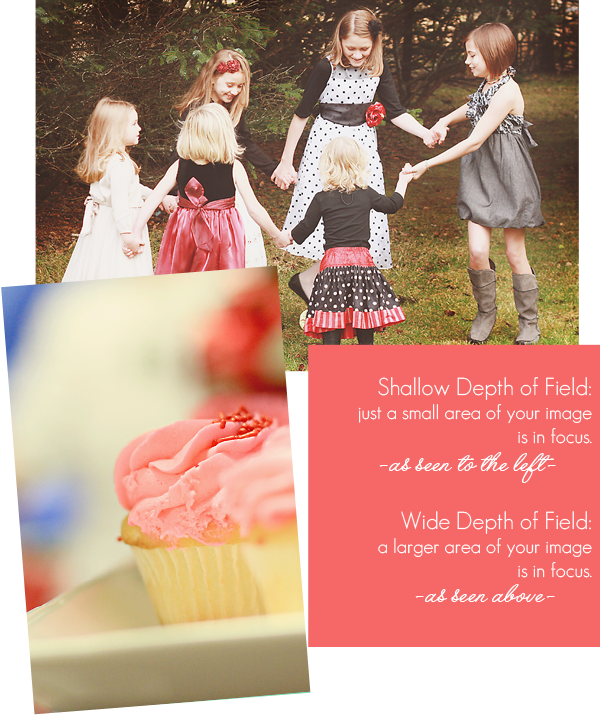
In short, your aperture controls the depth of field. Depth of field controls how much of a photo is in focus. If you have just a small amount of your image in focus, then you have what we call a shallow depth of field. If you have a large portion of your image in focus, then you have what we call a wide depth of field.
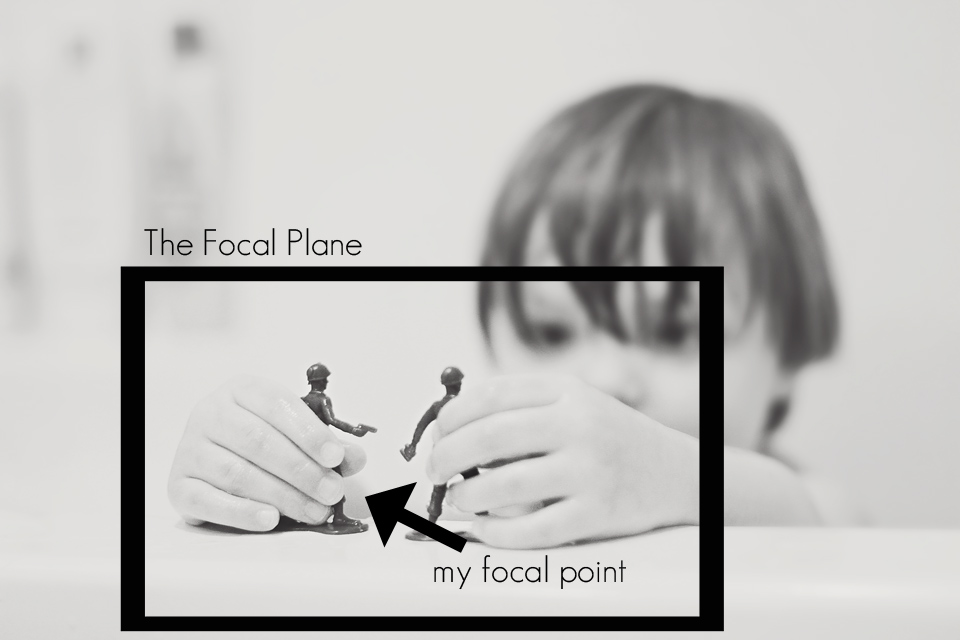
When understanding depth of field, it’s important to understand how depth of field works. Focus in an image doesn’t register in points, but rather in planes. This means that everything in same plane as the object you are trying to focus on is going to be in focus, while everything outside of that plane is going to be blurry. For example, in the photo below I wanted to focus more on the soldiers that Little Man was playing with, rather than just on him. I used a shallow depth of field to make sure that I just caught the toys in focus and not him in the background. As you can see, the area with the circle around it is on the same plane as my focal point, so this area is also in focus.
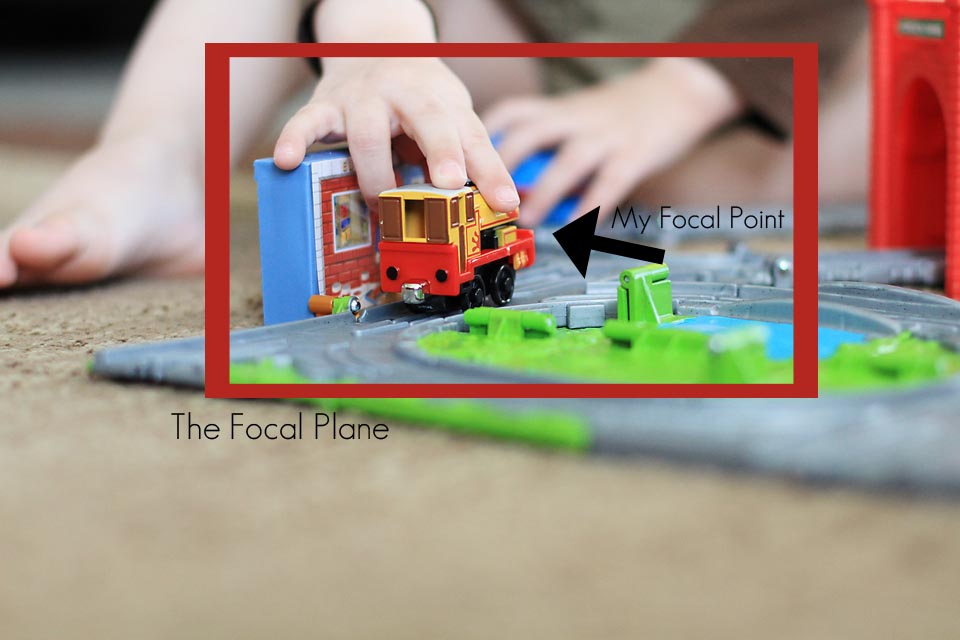
And again here with the trains. The area to the right and left of the train is in focus, as well as the area above and below it because they are in the same focal plane. Whereas the area that is closest to the camera and the area farthest away from the camera are out of focus because they are not on the same plane.
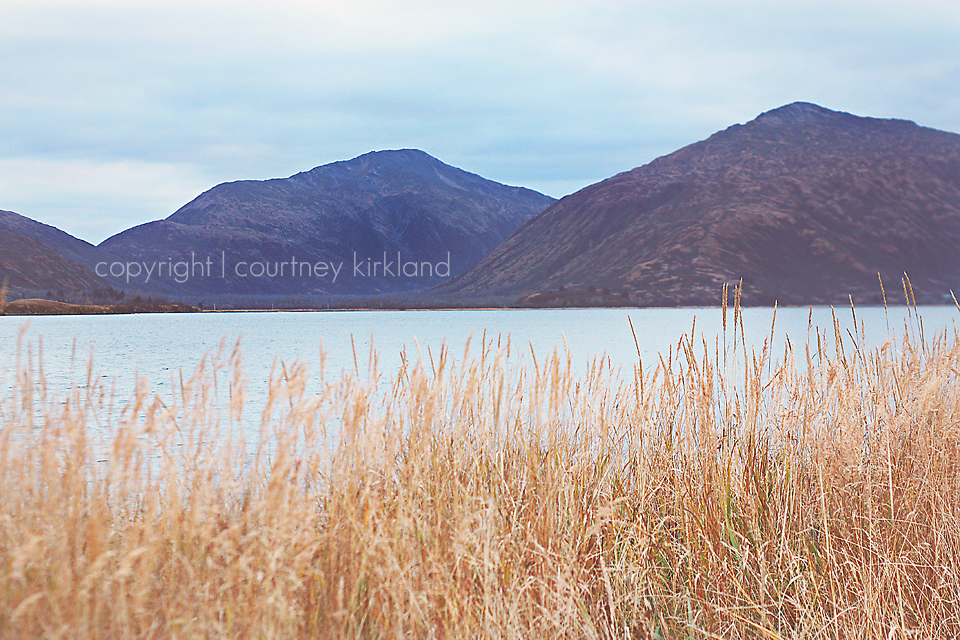
In the photo below, pretty much the entire photo is in focus because I’m using a wider depth of field. I wanted to capture everything that was going on, instead of just pieces of it, so there isn’t a lot of the image that is out of focus.
What controls your depth of field? Aperture.
Aperture is the measure of the amount of light that your camera lets in. It can opened or closed to allow for more light or less light. The larger the opening, the more light that will enter into your camera. The smaller the opening, the less light that will be let into your camera.
Amy compares aperture to having your pupils dilated in her workbook. If you open your eyes up really wide, you let in tons of light and everything gets blurry. Well, when you open your aperture up really wide to let in lots of light, you get an image that doesn’t have a lot in focus (shallow depth of field) and things are blurry.
Whereas when you squint your eyes to focus on something in more detail, you are letting in less light and are able to see things more clearly. That’s the same as using a SMALL aperture. If you use a small aperture and a small opening, you keep light from getting in and end up with more of your image in focus (wider depth of field).
Let me go over that one more time, because I know how confusing it can get….
- A larger opening in your camera (aperture) lets in a lot of light which will result in less of the image in focus (shallow depth of field).
- A smaller opening in your camera (aperture) lets in just a little bit of light which will result in more of the image in focus (wider depth of field).
How do you measure Aperture?
Aperture is measured in f-stops. These are the little numbers you see on the end of your camera’s lens. Numbers like f/1.4, f/2.8 or f/5.6. These numbers measure the size of the hole in your lens that lets light in (your aperture). Your aperture settings are controlled by your LENS and not your camera. This is why you will hear professional photographers recommending that someone upgrade their lens before they upgrade their camera. Because most photographers want the lowest possible number they can get on their lenses.
For example, I own a Canon 50mm 1.4 and a Canon 50mm 1.8
. Both of these are good lenses (and I highly recommend the 1.8 to anyone who is looking for a portrait lens without breaking the bank. They are available for both Canon
& Nikon
for less than $150), but the 50 mm 1.4 has a better aperture.
This is the part that gets tricky, so I encourage you to read and re-read this section until it registers. Don’t get frustrated if you don’t quite get it to start with. I had to write it down on a piece of paper and keep it with my camera for a few weeks until I finally “got it.”
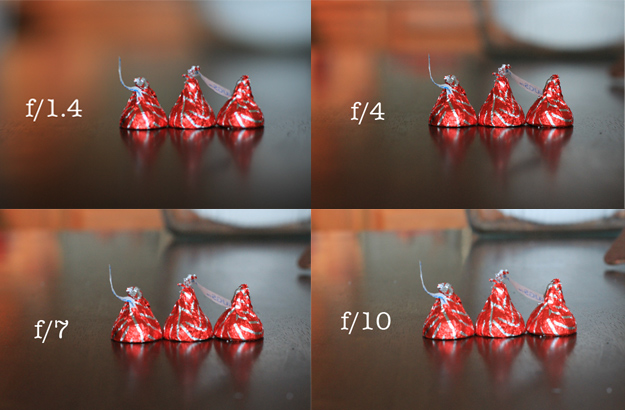
The LARGER the f-stop number (such as f/12 or f/15, etc) the SMALLER the aperture’s opening (the hole that let’s light in).
The SMALLER the f-stop number (such as f/1.4 or f/2.8) the LARGER the aperture’s opening (the hole that let’s light in).
F-Stops are fractions and we could spend hours going over how the inside of a camera works, etc. But the main thing to remember is that the bigger the hole (which means a SMALLER number), the more light that you let in so the more blur you get in your image. The smaller the hole (which means a HIGHER number) the less light you let in, which means that more of the image is in focus and there is less blur.
Typically when I’m shooting portraits or pictures of the little man, I keep my aperture at about 1.8 or 2.0, to create a softness around his face and help him stand out from the background. If I’m shooting pictures of more than one person, I’ll use an aperture that’s a bit larger. I read somewhere that a good rule of thumb to keep everyone’s face in focus is to go with the largest aperture that matches the number of people you are photographing. For example, if I’m photographing two people, I’d want to shoot at f/2.8. If I was photographing five people I’d shoot on f/5.8, etc. Since I don’t do a lot of group portraiture, I can’t attest to how accurate this is, but it seems to work.
As we continue to learn more about shooting in manual and how to control lighting, you will learn that most photographers build their settings around the aperture setting. I always set my aperture first and then the rest of my settings around it. I love the creaminess and softness that it adds to the background. That creamy, blurry background is called Bokeh and is the bee-knees when it comes to portraits.
Is your head spinning right now?! Don’t get overwhelmed! I’m going to use a easy and pretty popular “homework” method to help you guys understand aperture a bit better.
Take a look at your camera and notice that it has an Aperture Setting, usually depicted by an “A” or the letters “Av.” This means that YOU get to set the aperture and your camera will control the rest of the settings to give you a properly exposed image. Set your camera on this mode so that you can practice applying what we’ve just learned about Aperture.
Homework for the Week:
Grab a toy, a stuff animal, or a just some object that you can photograph and set it in front of you (near a window or outside!! Don’t forget to search for great light!). Take a series of pictures testing out different aperture settings. If your lens will go all the way down to 1.8 shoot the object at f/1.8, f/4, f/7 and f/12. Play with the numbers and the aperture and see what you get. Take some time to examine how the numbers change your depth of field and the bokeh in the background. Upload your photos to the Group Flickr Pool so Amy & I can see what you guys have been learning!
Don’t hesitate to ask any questions in the comment section if something isn’t quite making sense! Make sure you come back next week for Amy’s post on Shutter Speed. And be sure to check in tomorrow for a chance to win a fabulous Camera Strap from my Featured Sponsor: A Diva & 3 Dudes Design!
Leave a Reply Cancel reply
Truly easy-to-customize websites for those who need a polished look with a quick turnaround.
Learn More ↦
Shop premade designs
Draw in potential customers with a seamless web experience and SEO optimized site pages.
Learn More ↦
website design
Discover your creative voice with a unique logo development & coordinating brand collateral.
Learn More ↦
brand building
A seamless single logo brand identity experience for those with a clear vision.
Learn More ↦

[…] thought that since I had read the photography forums, had a general understanding of what Aperture, Shutter Speed and ISO were that I would just be able to pick my camera up and start shooting. […]
[…] to check them out! We’ve talked about Composition & Perspective, Finding Great Light, Understanding Aperture and Understanding Shutter Speed. All of these techniques build off of one another to create a […]
[…] and how to use your camera. We’ve gone over the basics of composition and lighting; what aperture is; how shutter speed, iso and white balance can change your photos, and we’ve talked about […]
Love love love this blog. I just recently got a Canon EOS Rebel T3 and so excited to learn how to take better photos. I was normally just a snap and go gal until the last year or so when I reliaze there is soooo much more to it. Any advice and helpful hints are always welcome 🙂
I just stumbled upon your blog a couple of weeks ago when Daily Buzz Moms did their photography theme. I LOVE this Move to Manual series and am just so excited to move myself through it. This post helped me understand why so many people buy additional lenses for their cameras. I looked at my lens and it only goes as low as f/3.5-5.6. Boo! I will be ordering a new lens asap. 🙂
What I can’t quite figure out is when I set my camera to “A” and try to adjust the aperture with my current lens, it won’t allow me to get lower than f/5.6. Is there a reason for that, off-hand? Does the range (3.5-5.6) refer to what I can get with something else being adjusted or accounted for? Like I would need to adjust something else to get the f/3.5?
I have a Sony A300. (No idea how well that rates as a DSLR – it was a gift I received a couple of years ago.)
[…] belong to) that you want to place your focal point on the eye that is closest to your lens. If your aperture is set properly, you should be able to focus on the eye closest to you and still get the other eye in focus as […]
I’m so glad I found this series! I have a Nikon P500. I have the same settings, but I can’t change lenses. My lowest number of f stop is 3.4 but no matter what I do, I can’t get the bokeh affect. Any suggestions? I’m beginning to think I can’t get that effect with this camera.
I’m shooting in manual and working with all sorts of settings but I can’t seem to do it. 🙁
These series are great Courtney.
great tips… thank you for sharing in a way that is easy to comprehend. I can’t wait to practice.